
Blog
Covalent Bonding Explained Simply: Key Facts for A Level Chemistry

Moving from GCSE to A Level Chemistry? Covalent bonding just got a whole lot more interesting! 🌟 While you might think you’ve got covalent bonds sorted (atoms sharing electrons, right?), A Level introduces you to a sneaky variation called dative or coordinate bonding that can completely change how you approach exam questions.
Don’t worry: I’m going to break down exactly what both types of bonding are, why they happen, and most importantly, how to spot them in exams and get those marks! Let’s dive in.

What Actually IS Covalent Bonding?
At GCSE level, you learned that covalent bonding happens when atoms share electrons to get full outer shells. Simple enough! But A Level digs deeper into the why and how.
Covalent bonds form when two atoms each contribute one electron from a half-filled orbital. These electrons pair up and hang out in the space between the two nuclei, creating a shared pair. Both atoms are attracted to this negatively charged pair, which pulls the nuclei closer together: and voilà, you’ve got a stable bond! 🙌
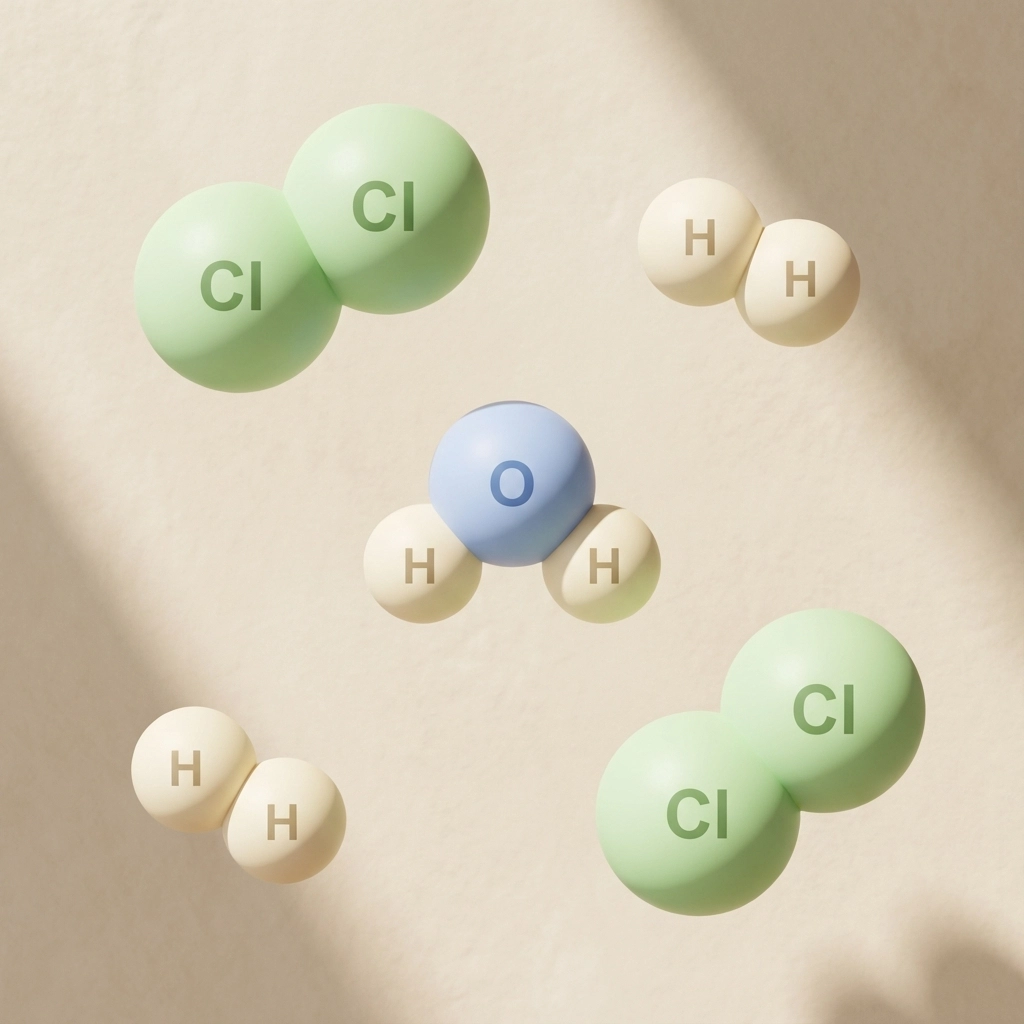
Classic Covalent Examples You Need to Know
- Chlorine (Cl₂): Each chlorine atom has 7 outer electrons and needs 1 more. They each contribute 1 electron to make a shared pair
- Hydrogen (H₂): Each hydrogen has 1 electron, needs 1 more. They share to both get that stable 2-electron arrangement
- Water (H₂O): Oxygen shares with two hydrogens to complete its octet
- Methane (CH₄): Carbon shares with four hydrogens
The key point? Each atom donates one electron to the bond. Remember that: it’ll matter when we get to dative bonding!
Enter Dative (Coordinate) Bonding: The Game Changer
Here’s where A Level gets spicy! 🔥 Dative covalent bonding (also called coordinate bonding) happens when one atom provides both electrons to the shared pair.
Think of it like this: instead of a 50-50 split where each atom brings one electron to the party, one atom brings both electrons while the other just provides an empty space (orbital) to put them.
What You Need for Dative Bonding
- One atom with a lone pair of electrons (a full orbital with 2 electrons)
- Another atom with an empty orbital that can accept those electrons
Once the bond forms, it behaves exactly like a normal covalent bond: both atoms share the electrons equally. The only difference is where the electrons originally came from!
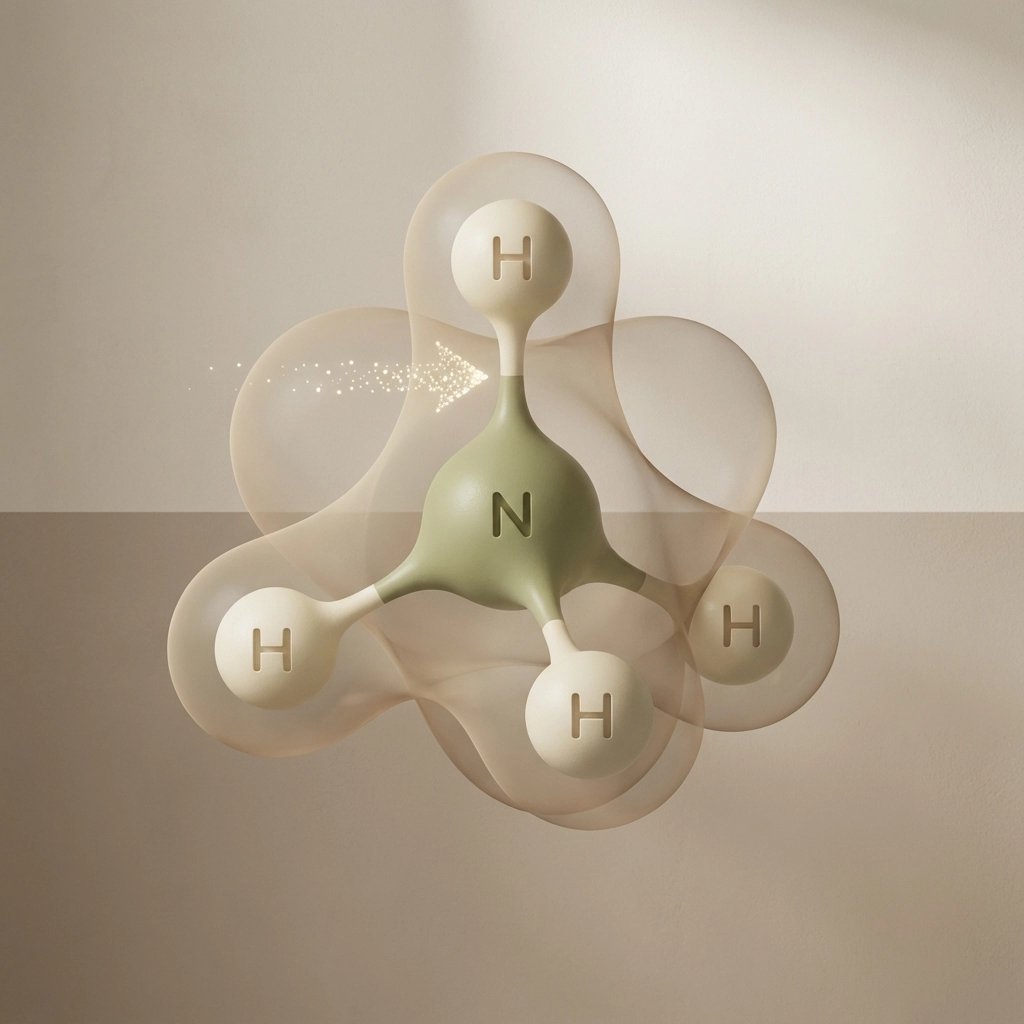
The NH₄⁺ Ion: Your Go-To Example
The ammonium ion (NH₄⁺) is the perfect example to understand dative bonding:
- Ammonia (NH₃) has a lone pair of electrons on nitrogen
- A hydrogen ion (H⁺) has an empty orbital (it’s literally just a proton!)
- The lone pair from nitrogen donates to the empty H⁺ orbital
- Result: NH₄⁺ with four identical N-H bonds (even though one started as dative)
Key Differences: Covalent vs Dative
| Covalent Bond | Dative Bond |
|---|---|
| Each atom contributes 1 electron | One atom contributes both electrons |
| Needs two half-filled orbitals | Needs one lone pair + one empty orbital |
| Drawn as simple line | Often drawn as arrow (→) |
| Both atoms “want” to bond | One atom “helps out” the other |
Important exam point: Once formed, you cannot tell the difference between a dative bond and a regular covalent bond. They have the same strength and properties!
Visual Cues That Scream “Dative Bond!”
Your visual alarm bells should go off when you see:
✅ Lone pairs clearly marked on diagrams
✅ Electron-deficient species (like BF₃, AlCl₃)
✅ Positive ions looking for electrons (H⁺, metal ions)
✅ Arrows (→) instead of lines in bond diagrams
✅ Complex ions with central metal atoms
Classic A Level Examples to Master
1. BF₃ + NH₃
- Boron in BF₃ only has 6 electrons (electron deficient!)
- Nitrogen in NH₃ has a lone pair
- The lone pair donates to boron’s empty orbital
2. AlCl₃ Dimer
- Aluminum chloride exists as Al₂Cl₆
- Two AlCl₃ molecules join via dative bonds
- Each Al provides an empty orbital, each Cl provides a lone pair
3. Complex Ions
- Metal ions (like Cu²⁺, Fe³⁺) have empty orbitals
- Ligands (like H₂O, NH₃) have lone pairs
- Multiple dative bonds form around the central metal
How to Draw Them (The Visual Tricks)
For regular covalent bonds: Draw a simple line between atoms
For dative bonds:
- Draw an arrow pointing from the electron donor to the acceptor
- The arrow starts at the atom with the lone pair
- Points toward the atom with the empty orbital
Pro tip: In complex molecules, you might see a mix: some regular covalent bonds (lines) and some dative bonds (arrows). Both are equally strong once formed!
Quickfire Revision Points 🎯
✨ Covalent bonding: Two atoms each donate 1 electron to share
✨ Dative bonding: One atom donates both electrons to share
✨ Both types result in identical shared electron pairs once formed
✨ Dative bonds need: lone pair + empty orbital
✨ Common dative examples: NH₄⁺, BF₃-NH₃, complex ions, Al₂Cl₆
✨ Drawing: arrows for dative, lines for normal covalent
✨ Exam keywords: “coordinate bond,” “lone pair donation,” “electron deficient”
Real-Life Exam Tips That Actually Work! 🏆
1. Look for the lonely electrons: If you see lone pairs marked on a diagram, there’s probably dative bonding happening somewhere nearby.
2. Count electrons around central atoms: If something has fewer than 8 electrons (like BF₃), it’s electron deficient and screaming for a dative bond.
3. Complex ion questions LOVE dative bonds: Any time you see metal ions surrounded by water molecules or ammonia, those are dative bonds forming.
4. Don’t overthink bond strength: Examiners often try to trick you: remember that dative bonds are just as strong as regular covalent bonds once they’re formed.
5. Practice drawing both types: Get comfortable switching between lines and arrows. Some exam questions specifically ask you to show which bonds are dative.
6. Watch your language: Use terms like “lone pair donation,” “coordinate bond,” and “electron deficient” in explanations: examiners love seeing the proper terminology!
Understanding the difference between covalent and dative bonding is crucial for tackling A Level Chemistry with confidence. Remember, it’s not about memorizing: it’s about recognizing patterns and knowing what to look for.
For more A Level Chemistry guidance and exam strategies that actually work, check out our comprehensive A Level Physical Chemistry guide: because understanding bonding is just the beginning of your chemistry journey! ❤️
Electronegativity & Shapes of Molecules: A Level Chemistry Essentials (With Simple Visuals)

Making the jump from GCSE to A Level Chemistry can feel overwhelming, especially when you’re suddenly dealing with electronegativity and molecular shapes 🌟 But here’s the thing: these concepts are actually your secret weapons for understanding how molecules behave! Let’s break them down into bite-sized, manageable pieces that’ll stick in your mind.
What is Electronegativity? (And Why Should You Care?)
Electronegativity is simply how much an atom wants to pull electrons towards itself when it’s bonded to another atom. Think of it like a tug-of-war: some atoms are much stronger at pulling than others!
The Pauling scale gives each element a number, and the higher the number, the more electronegative (electron-greedy) that element is. Fluorine is the champion with a value of 4.0, while elements like caesium are much weaker at around 0.7.
Here’s what you need to remember: electronegativity differences between atoms determine whether bonds are ionic, covalent, or somewhere in between. This isn’t just theory: it affects everything from boiling points to reactivity!

Electronegativity Trends Across the Periodic Table
The patterns are actually quite logical once you get them:
Across a period (left to right): Electronegativity increases 📈
- More protons in the nucleus = stronger pull on electrons
- Atomic radius decreases, so electrons are closer to the nucleus
Down a group: Electronegativity decreases 📉
- More electron shells = electrons further from nucleus
- Nuclear charge is “shielded” by inner electrons
Top right corner = most electronegative (fluorine, oxygen, nitrogen)
Bottom left corner = least electronegative (francium, caesium)
The noble gases are often left out because they rarely form bonds anyway!
Polar Bonds and Polar Molecules: The Real-World Impact
When two atoms with different electronegativities bond, you get a polar bond. The more electronegative atom becomes slightly negative (δ-), and the other becomes slightly positive (δ+).
Bond polarity depends on electronegativity difference:
- 0.0-0.4: Non-polar covalent
- 0.4-1.8: Polar covalent
- >1.8: Ionic character
But here’s the crucial bit: polar bonds don’t always make polar molecules! 🙌
Take carbon dioxide (CO₂): it has polar C=O bonds, but the molecule is linear, so the dipoles cancel out. The molecule is non-polar overall.
Water (H₂O), however, is bent, so the polar O-H bonds don’t cancel: making water highly polar. This is why oil and water don’t mix!
Molecular Shapes: Your VSEPR Theory Toolkit
VSEPR (Valence Shell Electron Pair Repulsion) theory is your go-to method for predicting molecular shapes. The idea is brilliantly simple: electron pairs repel each other and position themselves as far apart as possible.
Step 1: Count all electron pairs around the central atom (bonding AND lone pairs)
Step 2: Arrange them to minimize repulsion
Step 3: Describe the molecular shape based on atom positions only
Remember: lone pairs take up more space than bonding pairs because they’re only attracted to one nucleus instead of two. This means they push bonding pairs closer together!
The Essential Molecular Shapes You Must Know
2 Electron Pairs = Linear
- Bond angle: 180°
- Example: BeCl₂, CO₂
- Imagine a straight line: simple!
3 Electron Pairs = Trigonal Planar
- Bond angle: 120°
- Example: BF₃, AlCl₃
- Picture a flat triangle with the central atom in the middle
With 1 lone pair: Bent (like SO₂)
- Bond angle: About 119° (slightly less due to lone pair repulsion)
4 Electron Pairs = Tetrahedral
- Bond angle: 109.5°
- Example: CH₄, CCl₄
- Think of a pyramid with triangular faces
With 1 lone pair: Trigonal Pyramidal (like NH₃)
- Bond angle: About 107° (lone pair squeezes the others)
With 2 lone pairs: Bent (like H₂O)
- Bond angle: About 104.5° (two lone pairs = more squeezing!)
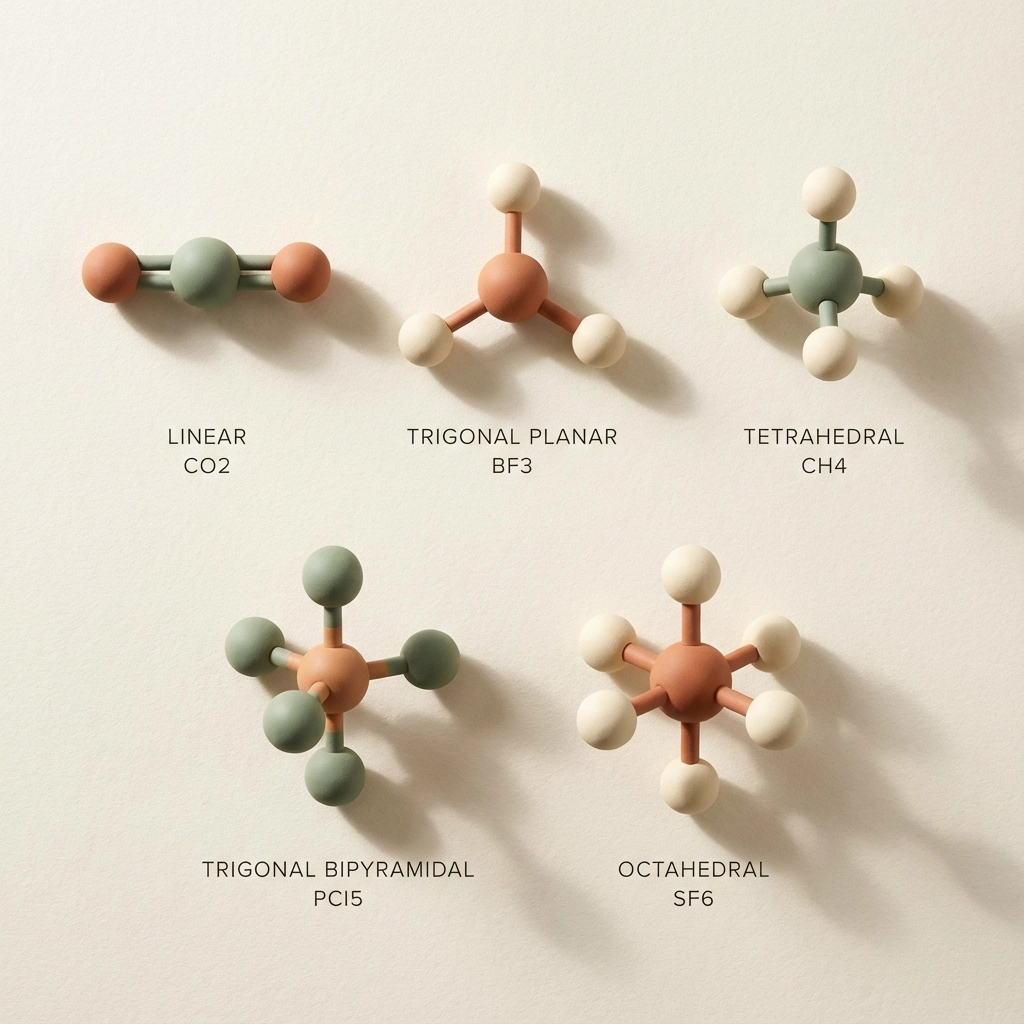
5 Electron Pairs = Trigonal Bipyramidal
- Bond angles: 90° and 120°
- Example: PF₅
- Looks like two pyramids stuck together at their bases
6 Electron Pairs = Octahedral
- Bond angles: 90°
- Example: SF₆
- Picture a square with atoms above and below the plane
How Lone Pairs Change Everything
Here’s your golden rule: lone pairs are bullies! They take up more space and push bonding pairs closer together. This is why:
- Ammonia (NH₃) has bond angles of 107°, not 109.5°
- Water (H₂O) has bond angles of 104.5°, much less than tetrahedral
Easy memory trick: Each lone pair typically reduces bond angles by about 2.5° from the “perfect” geometry ❤️
Quick Tips for Mastering These Concepts
For Electronegativity:
- F O N Cl are your most electronegative elements (in that order)
- Electronegativity differences predict bond polarity
- Molecular polarity depends on both bond polarity and molecular shape
For Molecular Shapes:
- Always count total electron pairs first
- Lone pairs matter for electron geometry, not molecular shape description
- Practice with dot-and-cross diagrams to see electron pairs clearly
- Bond angles decrease when lone pairs are present
Visual Memory Aids:
- Linear = stick
- Trigonal planar = flat triangle
- Tetrahedral = pyramid
- Trigonal pyramidal = pyramid with flat top
- Bent = boomerang shape

For more comprehensive A Level Chemistry support, check out our complete Physical Chemistry guide that covers these concepts alongside atomic structure and bonding.
Common Exam Pitfalls (And How to Avoid Them!)
Mistake 1: Forgetting that lone pairs affect bond angles
Fix: Always identify lone pairs before predicting angles
Mistake 2: Confusing electron pair geometry with molecular shape
Fix: Remember: molecular shape only describes where the atoms are
Mistake 3: Assuming polar bonds always mean polar molecules
Fix: Check if the dipoles cancel due to symmetry
Mistake 4: Getting trigonal pyramidal and trigonal planar confused
Fix: Pyramidal has a lone pair; planar doesn’t
Your Revision Checklist ✅
Electronegativity Essentials:
- Know the trend: increases across periods, decreases down groups
- Remember F > O > N > Cl for the most electronegative elements
- Electronegativity difference predicts bond type and polarity
- Polar bonds ≠ polar molecules (shape matters!)
Molecular Shape Mastery:
- Count all electron pairs around the central atom
- VSEPR theory: electron pairs repel and spread out maximally
- Lone pairs are larger and reduce bond angles by ~2.5° each
- Key shapes: linear (180°), trigonal planar (120°), tetrahedral (109.5°)
- Practice with examples: H₂O (bent), NH₃ (trigonal pyramidal), CH₄ (tetrahedral)
Quick Memory Tools:
- “FONCL” for electronegativity order
- Lone pairs are bullies that squeeze other electron pairs
- Symmetrical shapes often have non-polar molecules (even with polar bonds)
These concepts might seem tricky at first, but with practice, they become second nature! If you’re struggling with the transition from GCSE to A Level Chemistry, our survival guide has loads more tips to help you succeed 🍀
Remember: every chemistry expert started exactly where you are now. Keep practicing, stay curious, and don’t be afraid to ask for help when you need it!
Oxford-Educated Chemistry Specialist
With over 20 years of teaching experience at some of the UK’s top independent schools, I help ambitious students bridge the gap between hard work and top-tier results. I specialise in GCSE, A Level, and IB Chemistry tuition for students targeting Grade 9s and A*s. Based in the UK but working globally, I provide 1-1 online support for families in South and West London, Dubai, and Hong Kong, ensuring students are perfectly prepared for competitive medical applications and Oxbridge entries.
I’ve helped students achieve top grades from schools such as Alleyn’s, Dulwich College, Tonbridge, Sevenoaks, Brighton College, Wycombe Abbey, Caterham, St Paul’s, Dubai College, Dubai British School and Harrow International School Hong Kong.
Contact me archardchloe@gmail.com to discuss how I can help your child excel in Chemistry.